Saturday, October 23, 2010
DIY Canon 5D Repair
It wasn't a question of color quality, it was really a mechanical problem : pressing anywhere on the back panel would cause the colors to look as if the image had been "posterized" in photoshop.
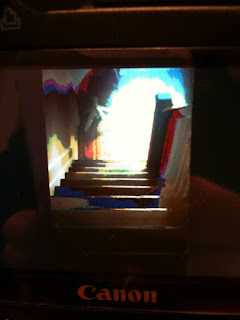
This is the original image:
I looked for similar issues on the internet but found only one person who had this problem and he opted to sell the camera instead of repairing it, so I had to find my solution...
Not wanting (daring) to open up the camera myself, I filled out a service form on Canon's website and was (almost) ready to send the camera for repairs, except they indicated it would take about 20 days once they received the camera. (oh, and it would cost almost 300$)
No way I can wait a month without my camera !
So I found this post about how to disassemble the 5D and decided to give it a shot myself.
Funny thing : I found a loose screw laying around inside the body of the 5D... And I don't mean "loose" as in "not tight". I mean "loose" as in "free-as-a-bird" ! Luckily I also found where it belonged! (In the lower right corner of the next picture. In fact, all the screws holding that PCB on the right of the camera, were loose and begging to fall off!
After a lot of fidgeting, I identified one of these flat cables as the culprit for the LCD problems. There was no apparent damage to the cable but it stopped working well when it was compressed too much at its bending point. My solution was to add an officially-not-canon-replacement-part : a small piece of rolled up masking tape!! I used it to prevent a sharp bend at the point where the cable normally folds.
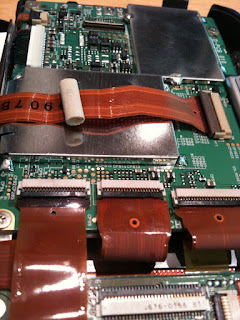
I'm very happy that my "fix" works well. It took a little under 3 hours (research included) and saved me 300$ !
Here are two other pics of the camera :
(oh ... And I did manage to put it back together ! No Problem !)
Wednesday, October 28, 2009
Postprod + Best Camera
Alors voilà. J’ai essayé l’application Best Camera sur iPhone et ça m’a fait découvrir à quel point une photo peut devenir belle et véhiculer plus d’émotions quand quelques effets y sont appliqués. En fait, c’est vraiment l’équivalent du développement en chambre noire : c’est à ce moment que l’atmosphère de la photo est en grande partie créée.
Ça ne nécessite pas des retouches extrêmes... C’est surtout une question d’ajustement des couleurs et de la lumière... Dans cette photo, j’ai ajouté un effet de vignette (plus foncé dans les coins), baissé la luminosité et augmenté un peu le contraste. J’ai aussi désaturé un peu les couleurs et donné une teinte plus jaune à l’ensemble de la photo. C’est tout...
Ah oui, une bordure blanche aussi !
J.
Monday, June 29, 2009
DIY sync port mod on Canon 430EX
Ça y est, j'ai enfin fait la modification de mon flash pour permettre de le brancher directement à mon appareil ou à un PocketWizard sans utiliser un adapteur et un "hotshoe"... Ça marche super bien...
Merci à Olivier pour son fer à souder, d'ailleurs !
Voici les détails :
:)
Wednesday, May 6, 2009
Expérimentations avec un 50 mm
Depuis que j'ai reçu un 50mm (merci Geneviève !!) pour mon anniversaire, je traîne l'appareil photo avec moi beaucoup plus souvent et les occasions photo sont donc plus nombreuses.
La profondeur de champs et la netteté de cet objectif me plaisent énormément !!
D'autres photos à suivre !
J.
Monday, January 26, 2009
Mini-Studio
Les résultats sont plutôt satisfaisants, je trouve :)
Saturday, January 24, 2009
Offre d'emploi
Thursday, January 22, 2009
Il faut bien commencer quelque part...
Qui sait, peut-être qu'un jour quelqu'un viendra même voir ce qu'il y a ici ?
1 flash à gauche de la jarre.
Le noir tout autour de la jarre est dans la photo originale.
Quelques retouches dans photoshop pour effacer le support en dessous de la jarre.